Solved: How do I fix Steam Client Bootstrapper and Steam Client WebHelper High CPU usage on Windows? |
您所在的位置:网站首页 › 文件被steam client bootstrapper锁定 › Solved: How do I fix Steam Client Bootstrapper and Steam Client WebHelper High CPU usage on Windows? |
Solved: How do I fix Steam Client Bootstrapper and Steam Client WebHelper High CPU usage on Windows?
|
Table of Contents Problem SymptomContent SummaryPotential CausesPre-checkSolution 1: Run Steam client as as administratorSolution 2: Execute SFCSolution 3: Disable GPU accelerated rendering in web viewsSolution 4: Disable Steam Overlay featureSolution 5: Change the Steam Client’s skin back to default skinSolution 6: Set Library as default Steam windowSolution 7: Use Beta Steam ClientSolution 8: Block Red Shell Spyware in hosts fileSolution 9: Repair Steam serviceSolution 10: Disable BroadcastingSolution 11: Workaround for Big Picture ModeSolution 12: Update graphics driverSolution 13: Re-install Steam ClientSolution 14: Report to Steam SupportReference Problem SymptomThe Steam Client Bootstrapper app and Steam Client WebHelper app are background apps used to download and install updates or replace missing files without an interruption. Steam players have reported that Steam Client Bootstrapper app and Steam Client WebHelper app show high CPU resource usage even when Steam service is idle or closed. Follow the below solution steps to resolve high CPU usage by the Steam Client Bootstrapper app and Steam Client WebHelper app issue. 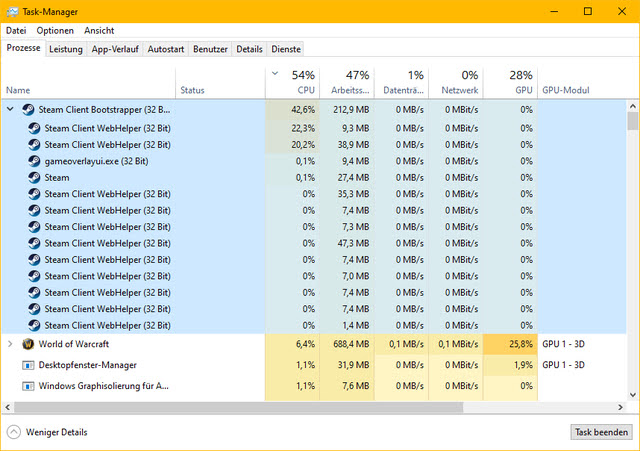 Content Summary
Potential Causes Pre-check Solution 1: Run Steam client as as administrator Solution 2: Execute SFC Solution 3: Disable GPU accelerated rendering in web views Solution 4: Disable Steam Overlay feature Solution 5: Revert the Steam client’s skin to the default Solution 6: Set Library as default Steam window Solution 7: Use Beta Steam Client Solution 8: Block Red Shell Spyware in hosts file Solution 9: Repair Steam service Solution 10: Disable Broadcasting Solution 11: Workaround for Big Picture Mode Solution 12: Update graphics driver Solution 13: Re-install Steam Client Solution 14: Report to Steam Support Reference Potential Causes Instability caused by Steam Overlay while in-game. Custom skin. Bug in Big Picture Mode. Set the Steam homepage to the Store. Infected by Virus or Spyware especially Red Shell spyware. Pre-check Restart PC. Scan Windows with antivirus and antimalware software. Solution 1: Run Steam client as as administratorIf the Steam app is pinned to the taskbar, right-click the Steam shortcut and select the Run as Administrator option. 
If you are accessing Steam app through a shortcut on hard-drive or SSD, right-click the Steam shortcut and select the Run as Administrator option.  Solution 2: Execute SFC
Step 1: Press Windows key once. Step 2: Type cmd in the search box. Step 3: Choose Run as administrator to open an elevated command prompt. Step 4: Type sfc /scannow and press Enter. Wait for the process to complete.  Solution 3: Disable GPU accelerated rendering in web views
Step 1: Start Steam client with Run as administrator option. Step 2: Click Steam on the top left side and then select the Settings. Step 3: Click on the Interface tab at the left side menu. Step 4: Uncheck the GPU accelerated rendering in web views option. 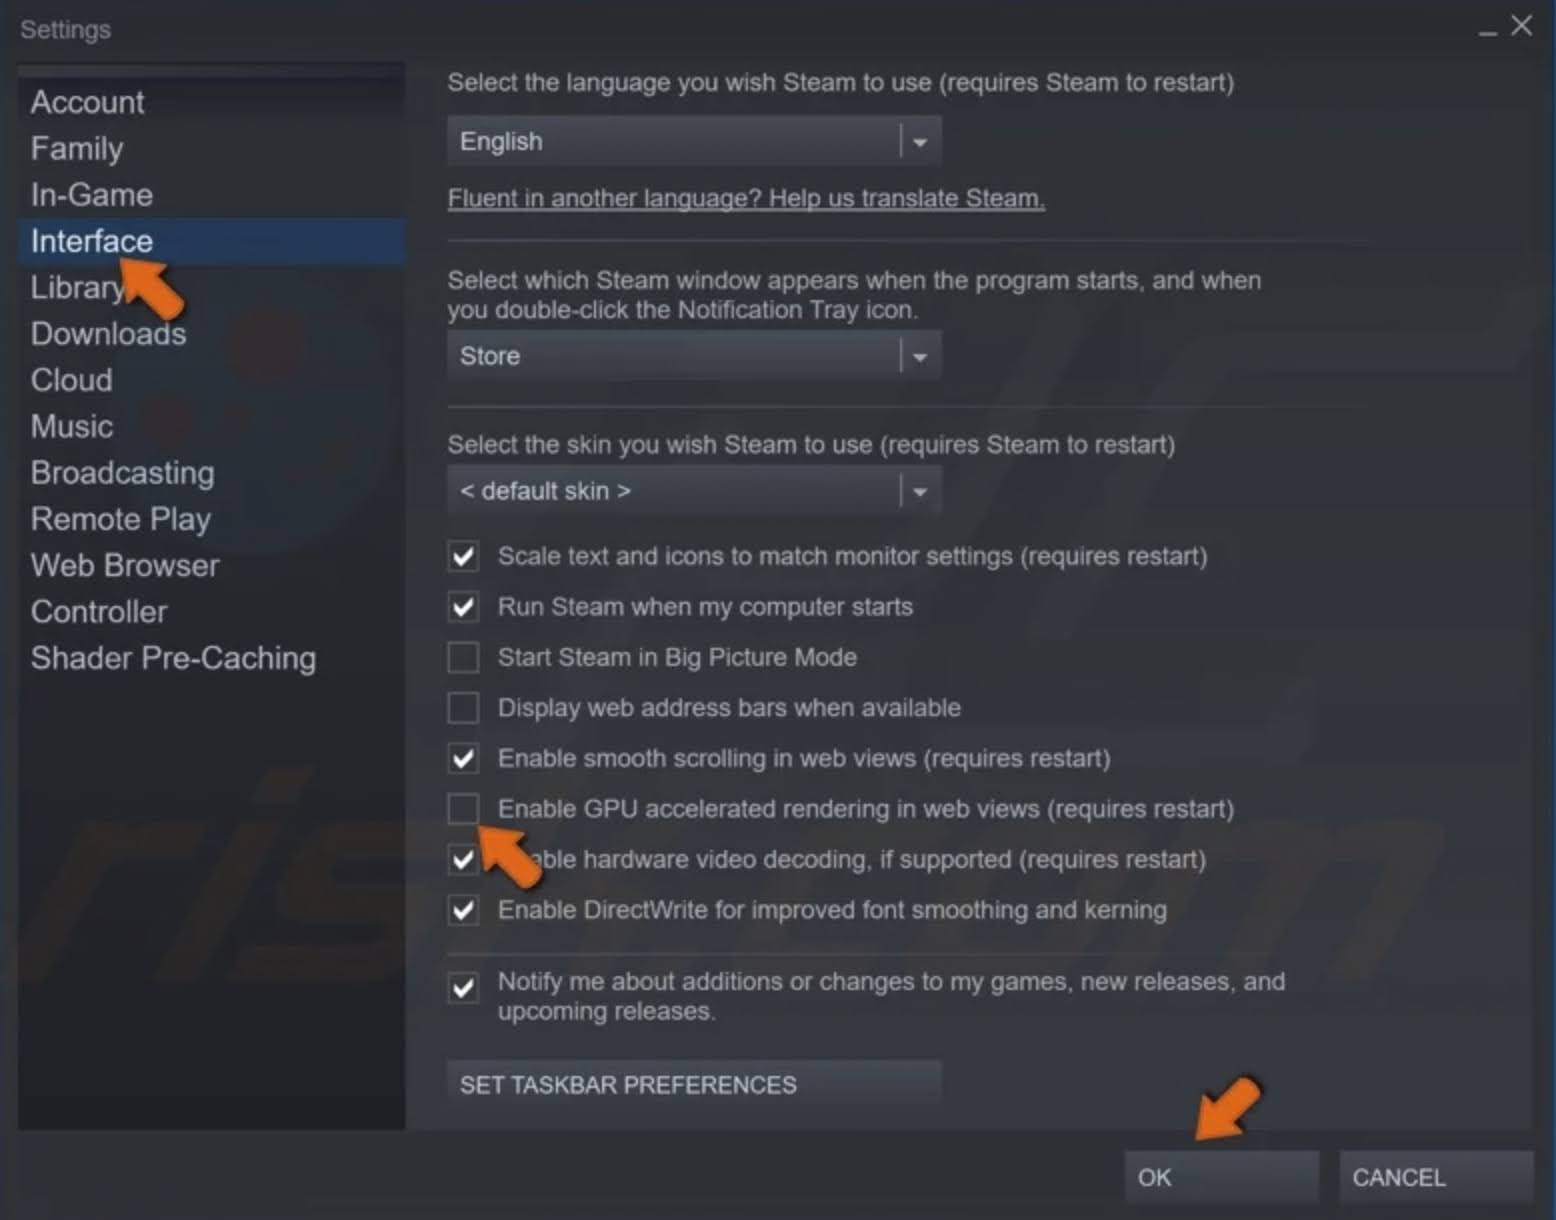
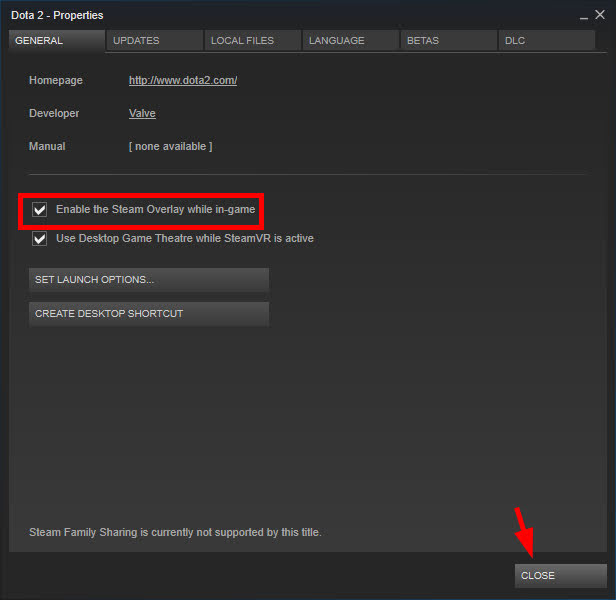
Step 5: Click the OK button to apply the changes. Step 6: Click the Steam option at the top left part of the Steam client. Step 7: Choose Exit to exit from Steam PC Client completely. Solution 4: Disable Steam Overlay featureStep 1: Start Steam client with Run as administrator option. Step 2: Click Steam on the top left side and then select the Settings. Step 3: Click on the In-Game tab at the left side menu. Step 4: Go to the GENERAL tab. Step 5: Uncheck the Enable Steam Community In-Game or Enable the Steam Overlay while in-game option. 

Step 6: Click the OK button to apply the changes. Step 7: Click the Steam option at the top left part of the Steam client. Step 8: Choose Exit to exit from Steam PC Client completely. Solution 5: Change the Steam Client’s skin back to default skinStep 1: Start Steam client with Run as administrator option. Step 2: Click Steam on the top left side and then select the Settings. Step 3: Click on the Interface tab at the left side menu. Step 4: Click the dropdown box for the Select the skin you wish Steam to use (requires Steam to restart) option at the top of the window and choose the < default skin > option from the context menu. 
Step 5: Click the OK button to apply the changes. Step 6: Click the Steam option at the top left part of the Steam client. Step 7: Choose Exit to exit from Steam PC Client completely. Solution 6: Set Library as default Steam windowStep 1: Start Steam client with Run as administrator option. Step 2: Click Steam on the top left side and then select the Settings. Step 3: Click on the Interface tab at the left side menu. Step 4: Click the dropdown box for the Select which Steam window appears when the program starts, and when you double-click the Notification Tray icon option at the top of the window and choose the Library option from the context menu. 
Step 5: Click the OK button to apply the changes. Step 6: Click the Steam option at the top left part of the Steam client. Step 7: Choose Exit to exit from Steam PC Client completely. Solution 7: Use Beta Steam ClientStep 1: Go to Start > Steam PC client. Step 2: Click Steam on the top left side and then select the Settings. Step 3: Click on the Account tab at the left side menu. Step 4: Click on the CHANGE button under Beta participation section. 
Step 5: Choose the Steam Client Candidate setting and Apply the changes. Step 6: Click the OK button to apply the changes. Step 7: Click the Steam option at the top left part of the Steam client. Step 8: Choose Exit to exit from Steam PC Client completely. Solution 8: Block Red Shell Spyware in hosts fileStep 1: Click the Start menu button and search for File Explorer Options. Click the first option which will appear as a result to open it. Step 2: Go to the View tab and switch the radio button under the Hidden files and folders option to Show hidden files, folders, and drives. Click the OK button to apply the changes. 
Step 3: Press on the Windows + R key combination to open the Run box. Step 4: Type notepad in the Run box to open Notepad program. Step 5: Copy and paste the following code in the Notepad: @echo off set hostspath=%windir%\System32\drivers\etc\hosts echo 0.0.0.0 redshell.io >> %hostspath% echo 0.0.0.0 api.redshell.io >> %hostspath% echo 0.0.0.0 treasuredata.com >> %hostspath% echo 0.0.0.0 api.treasuredata.com >> %hostspath% echo 0.0.0.0 in.treasuredata.com >> %hostspath% echo 0.0.0.0 cdn.rdshll.com >> %hostspath% echo 0.0.0.0 t.redshell.io >> %hostspath% echo 0.0.0.0 innervate.us >> %hostspath% echo Host file edited. pause exit Step 6: Press the Ctrl + S key to save the file or click on File > Save As… option. Step 7: Choose All files (*.*) for the Save as type, set Encoding to ANSI, and enter the file name as script.bat (with the .bat extension). Step 8: Click on the Save button to save script file on your Desktop. Step 9: Locate the script file on your PC, right-click on it, and choose the Run as administrator option from the context menu. Solution 9: Repair Steam serviceStep 1: Press the Windows + R key to open the Run dialog box. Step 2: Type in the command below in the dialog box which appears and use the Ctrl + Shift + Enter key to execute the command with administrator right: "C:\Program Files (x86)\Steam\bin\SteamService.exe" /repair 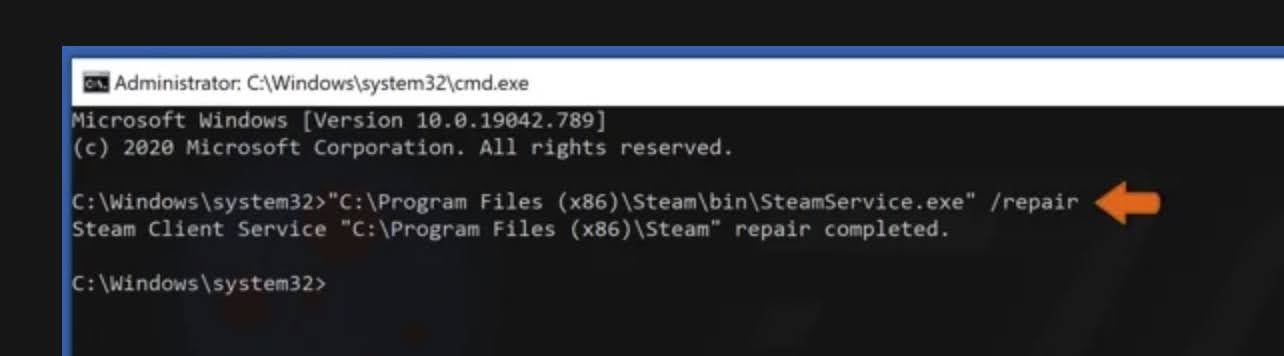
Note: C:\Program Files (x86)\Steam is the default install location of the Steam Client. Replace it if you have installed Steam Client on another location. To identify the installation directory of Steam Client, right-click on the Steam desktop icon and select the Open file location option from the context menu. Solution 10: Disable BroadcastingStep 1: Start Steam client with Run as administrator option. Step 2: Click Steam on the top left side and then select the Settings. Step 3: Click on the Broadcasting tab at the left side menu. Step 4: Click on the dropdown box for Privacy setting. Step 5: Select the Broadcasting disabled option. 
Step 6: Click the OK button to apply the changes. Step 7: Click the Steam option at the top left part of the Steam client. Step 8: Choose Exit to exit from Steam PC Client completely. Solution 11: Workaround for Big Picture ModeStep 1: Start Steam client with Run as administrator option. Step 2: Click Steam on the top left side and then select the Settings. Step 3: Click on the Controller tab at the left side menu. Step 4: Click on the GENERAL CONTROLLER SETTINGS button. 
Step 5: Untick all the options and then click on the Back button. 
Step 6: Click on the BIG PICTURE CONFIGURATION button, press the OK button and then close it. Repeat the same steps for DESKTOP CONFIGURATION and GUIDE BUTTON CHORD CONFIGURATION.  Solution 12: Update graphics driver
Step 1: Press the Windows key + R to open the Run dialog. Step 2: Type devmgmt.msc in the Run dialog box and click on the OK button or press the Enter key to open the Device Manager. Step 3: Go to the device category and click on it to expand the section. Step 4: Right-click on the device name and select the Update driver option from the context menu. 
Step 5: Select the Search automatically for updated driver software option for Windows to start to search and install the latest device driver on the computer.  Solution 13: Re-install Steam Client
Step 1: Navigate to the installed Steam directory. Step 2: Back up the following folder by moving it to another location so that you can restore back the download game or application after reinstall. Steamapps Userdata Skins Steam.exe Ssfn files
Step 3: Delete some files such as appcache, config, bin, and others. Step 4: Open the Control Panel. Step 5: Select the Programs. Step 6: Go to the Programs and Features section. 
Step 7: Locate Steam on the list, right-click on it and choose the Uninstall option from the context menu. 
Step 8: Steam Uninstall wizard will display, click on the Uninstall button to start the uninstallation process. 
Step 9: Restart your computer. Step 10: Download the latest Steam client and proceed to install it. Steam client for Windows Steam client for macOS Steam client for DebianStep 11: Move back the backup folder including Steamapps folder you have backed up to the Steam directory. Solution 14: Report to Steam SupportStep 1: Browse to Steam Support page. Step 2: Sign in in with Steam account. Step 3: Select the most relevant option on the page. Step 4: The Help site will guide you to self-solve the issue or you can raise a help request to the Steam Support team. Reference reddit > r/Steam > [FIX] Steam 20-30% high CPU usage Steam Community > Steam client Bootstrapper high CPU usage when idling. – SOLVED |
【本文地址】
今日新闻 |
推荐新闻 |